
Spring tarts with vegetable spirals
A couple of years ago a food pic went viral on the internet. I think it originated in Europe and featured a gorgeous round tart filled with spirals of multi coloured vegetable ribbons. The image proliferated in cyberland and here I am, two years later, jumping on the vegetable spirals bandwagon. Better late than never? you be the judge.
The technique is not complicated but requires a good dose of patience. You slice the vegetables thinly on a mandolin, cut the larger ones in half vertically so they are of equal width and then begin rolling them into a spiral, alternating the colours to create the effect. Work with the vegetable slices when they are still somewhat wet as they stick better that way.
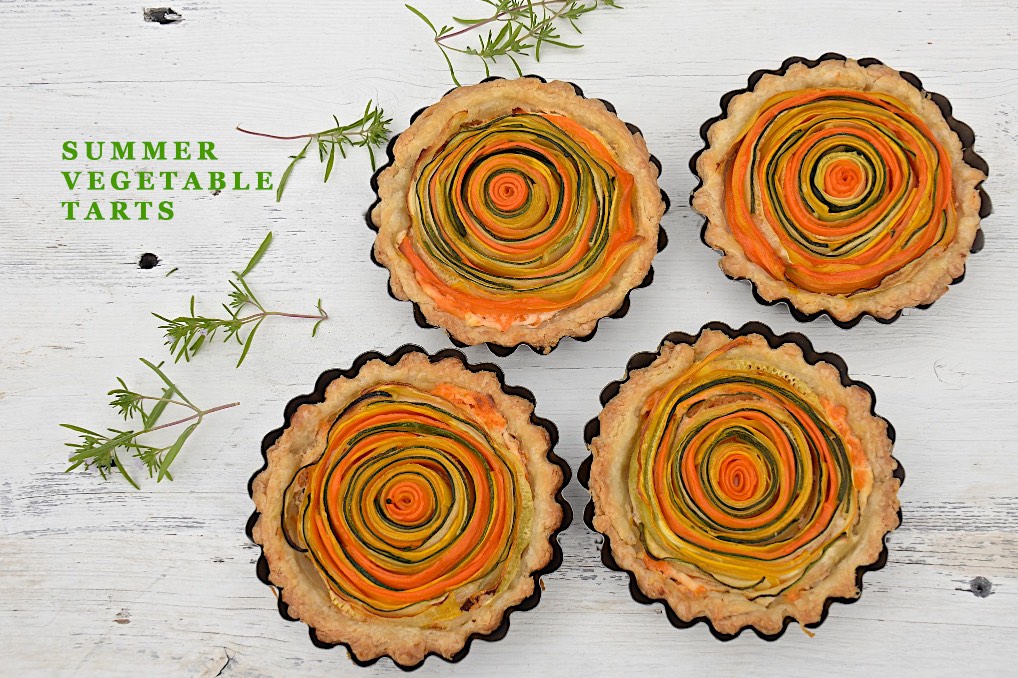
Sumer vegetable spiral tarts
I set out to make a 9″ tart but after starting to arrange the thinly sliced vegetables in a spiral pattern, made it half way through before deciding to make it in individual tart size instead. I like individual serving and making the smaller spirals is easier as you can hold them together with your hand. You can build the spiral on the cutting board, then lift it and place in the tart shell on top of the filling, or you can work inside the tart, working from the center out. For the filling I combined cream cheese, goat cheese and grated cheddar in approximately equal quantities of 1/2 cup each, then spread this on the bottom of the tart. Press the spiral lightly into the filling to anchor it. When baked, the cheeses melt just enough to create a creamy base for the vegetables that contrasts with the crisp buttery crust.
The recipe is long to write but it is actually quite simple. You can probably figure out how to do it just from looking at the image. However, I did write it out below.
Other than making tarts I took a cake decorating class at a local store and had fun decorating a bunch of just baked vanilla cupcakes. I don’t have major ambitions in this department, but wanted to get the hang of a few piping techniques that I can then apply to meringues, eclairs, some minimal decorations for cakes and of course for cupcakes. If I end up with photo-worthy creations I will post them on the blog. I am also curious about cake pops. Why am I that interested in this now is a mystery even to me but I enjoy playing in the kitchen. As I tell my kids when they ask what I am up to, I am “playing in the sandbox”.
Enjoy.
Makes 8 individual tarts or 2 8″ tarts. You can use only half the dough and keep the rest in the freezer.
Ingredients:
Tart pastry:
2 cups flour
A pinch of salt
 A pinch of sugar
1 1/2 sticks unsalted butter, cold, cut into small cubes
1/3 cup ice water
Place flour, salt and sugar in a food processor and pulse to mix.
Add the cold butter and pulse with on/off until the butter pieces are coated with the flour.
Begin adding the water in a thin and steady stream while continuing to pulse on and off.
When the dough looks wet stop pulsing. The dough will not yet come together but no loose flour remains.
Scrape the dough onto the work surface (I work over a sheet of parchment) and quickly gather the dough into a disk, handling it as little as possible. There should be small pieces of butter visible in the dough. Wrap in plastic and refrigerate for 1 hour.
When ready to proceed remove the dough from the refrigerator and cut in half.
Working with one half at a time roll the dough out into a circle large enough for one 8″ tart or 4 individual tarts.
To fit the dough into the tart pans you have a couple of options: either cut it into circles large enough to fit into the pans and press them into place individually. Or do it all at once: set the tart pans close together on the counter, roll the dough sheet onto the rolling pin and unroll it over the tart pans. Gently press the dough into the tart pans and then roll the rolling pin over pressing it gently onto the edges. This will cut the dough into each individual tart pan.
Without stretching the dough, ease it into the tart pans so it fits in the corners and along the sides.
Refrigerate until cold before filling.
Filling:
1/2 cup cream cheese
1/2 cup goat cheese
1/2 cup shredded cheddar cheese
Combine the cheeses in a bowl and bring to room temperature. When they are soft, mash them together with a spoon until blended.
 Vegetable spirals:

2 green zucchini
2 yellow zucchini
3 carrots
1/4 cup melted butter for brushing over the spirals before baking
salt (for sprinkling over the spiral before baking)
Cut off the ends of the zucchini and carrots, then slice into vertical ribbons with a mandolin or a vegetable peeler.
Stack the ribbons and cut them by half vertically so they are all approximately of equal width. Depending on their size, you may not need to cut the carrots.
Assembling:
Remove tart shells from the refrigerator and spread with some of the cheese filling.
Begin rolling the vegetables into a spiral form. Start with a ribbon of carrot and roll it onto itself tightly.
Now add another ribbon of green or yellow zucchini and wrap it around the carrot. Keep the skin side of the ribbons up for better visual.
Continue wrapping the ribbons around, alternating the colours and making the spiral larger until you reach the size that would fit inside the tart shell (see note).
Gently lift the spiral and lay it on the filling in the tart shell. Adjust by adding a strip or two as needed, so the spiral reaches around the edges. Gently press it into the cheese to anchor it.
Note: you canalso build the spiral in the tart, starting at the center and working your way outwards.
Baking:
Place the tarts on a baking sheet, brush melted butter over the vegetables and bake at 400°F for 30-40 minutes until the pastry is crisp and just beginning to turn golden. Do not let the vegetables brown.
Remove from oven, let cool a little and then remove from the tart pan.
Serve warm with a crisp salad in lemony vinaigrette.

Summer vegetables spiral tarts
2 Comments
You aced it! I wouldn’t even attempt to try. I suffer from limited patience. 🙂
Haha, I don’t have patience either, hence the smaller tarts:).but it was fun. Thanks Joan.